Tutorial: Filtering lists
In ShareScope you can click on the Help button and access a series of tutorials that give you an overview of the way the program works. This training zone article is designed to complement these tutorials but also offer more detail than they are able to.
How to access filtering in ShareScope
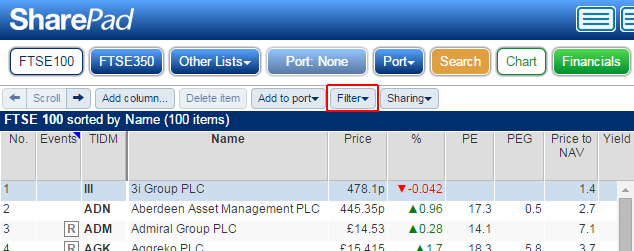
To access the filter functionality in ShareScope, click on the Filter button on the blue toolbar.
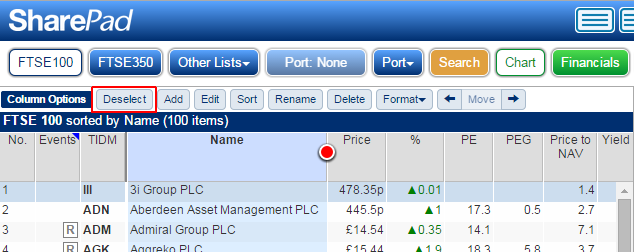
If you cannot see the Filter button then you may have a column selected; click on the Deselect button on the blue toolbar and you should then be able to see the Filter button.
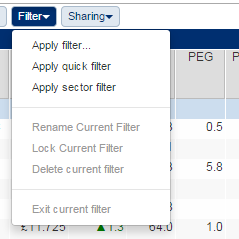
When you click on the Filter button you will be presented with a menu from which you can choose:
Apply filter...
This is the main filtering option, from here you can create filters, save filters, load filters and access the filter library.
Apply quick filter...
This takes you straight to a new filter table and allows you to create a temporary filter without the need to give the filter a name etc. The temporary filter can then be saved once you've created it if you wish to.
Apply sector filter...
This allows you to quickly filter the current list by one or more sectors.
Creating a new filter
Click on Filter then Apply filter... and the Apply a filter to the list dialog window will be opened:
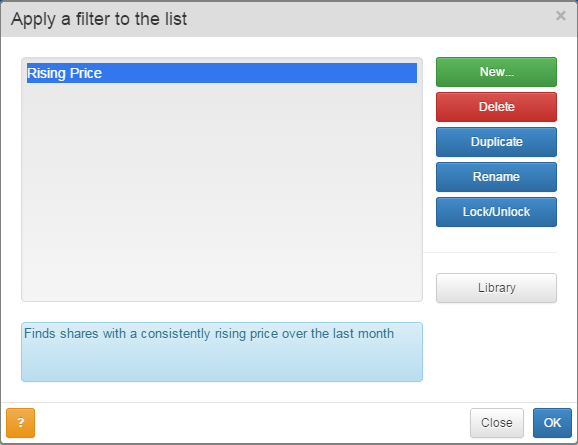
To create a new filter, click on the green New... button.
The Create a new filter dialog window will open.
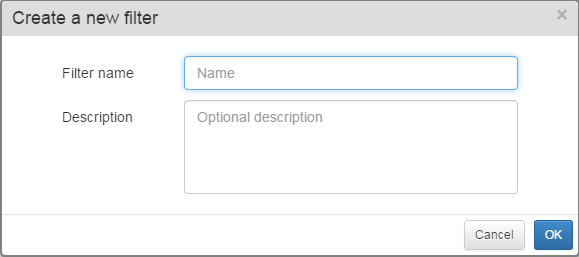
Give your filter a name and a description. Note: descriptions aren't compulsory. In the case of this tutorial let's call the filter "5 years price growth."

When you click on OK the filter will be created and will be the current selected filter in the list. Click on OK on the Apply a filter to the list screen and you will be taken to a new list table. From here you will then be able to start adding criteria to your filter.
Adding a criterion to the filter
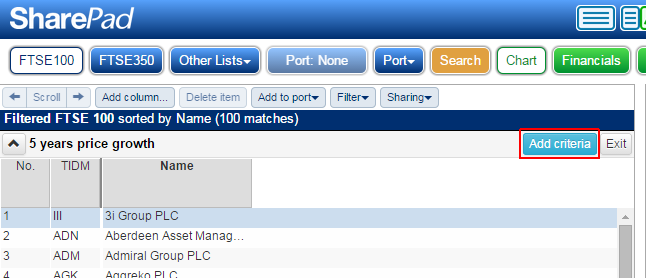
Click on the Add criteria button and the Add criteria window will open. Select the Price option and then select Price change on the left hand side.
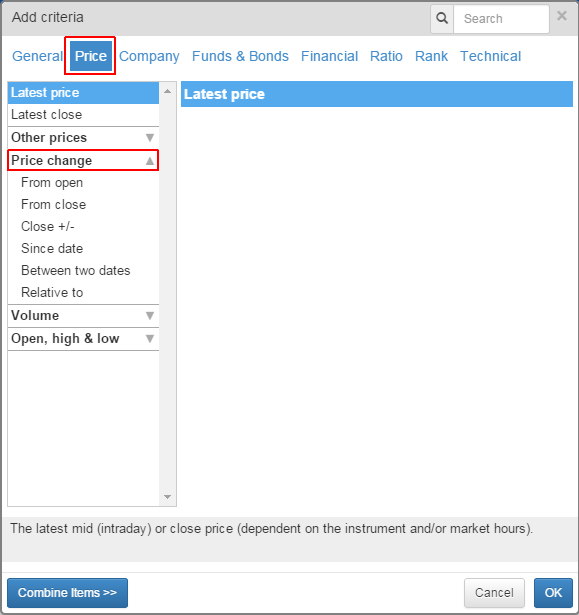
Select Between two dates from the options beneath Price change.
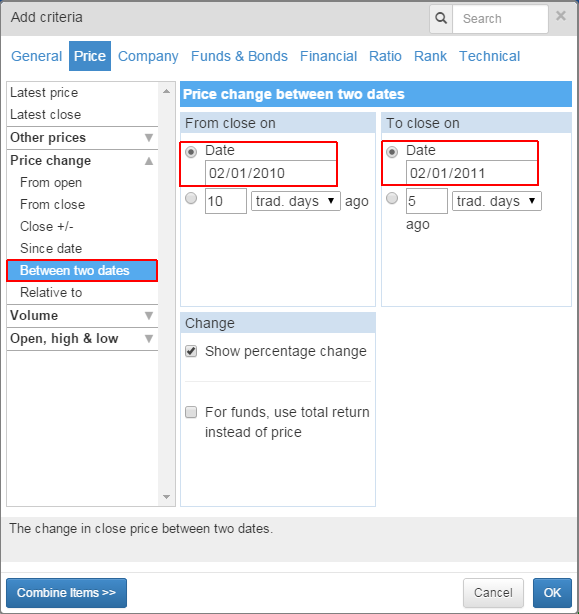
On the right-hand side of the dialog screen select Date on the From close on panel and also on the To close on panel. Then change the left-hand year to 2010 and the right-hand year to 2011. You do not need to change the selection on the Change panel. Once you have entered the correct dates click on OK.
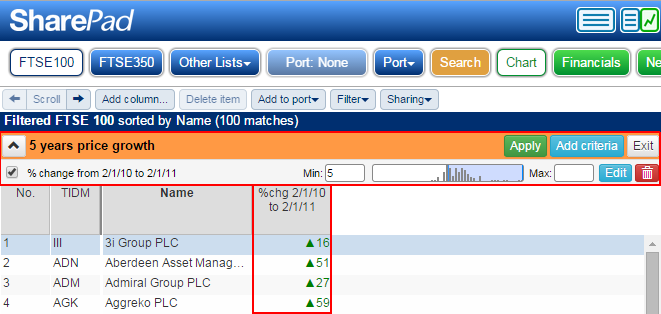
A criterion has now been added to the filter, however, it is not yet filtering the list as you can see no Minimum or Maximum values have been added to the criterion.
You can also see that a column has been added to the table that shows the values for this criterion for each of the shares in the list.
Enter 5 into the Min: value box and then click on the Apply button and the list will be restricted to those shares that grew by a minimum of 5% from 2/1/10 to 2/1/11.
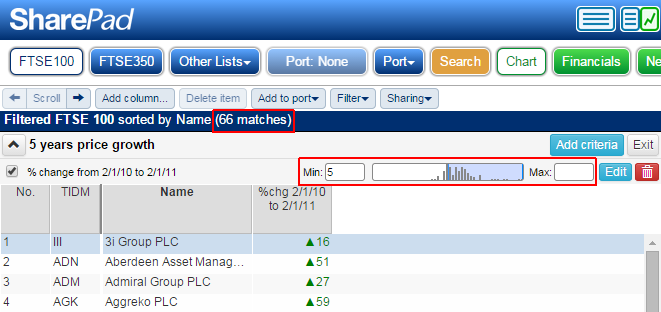
You can see that my current list, the FTSE 100, has been restricted to 66 matches. You can also see the range, between the Min and Max values has changed to reflect the fact I have set 5% as my minimum value.
Adding multiple criteria
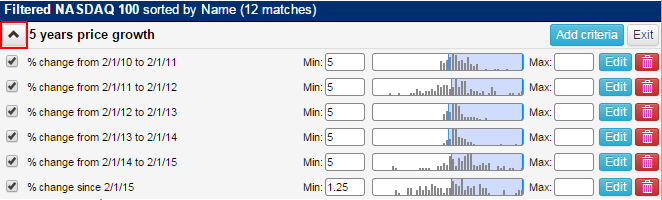
The process we used to add the first criterion can now be repeated for the following pairs of years: 2011 & 2012, 2012 & 2013, 2013 & 2014 and 2014 & 2015. Note: It is important to remember to select the Date option on the left-hand side and the right-hand side when changing each of the years.
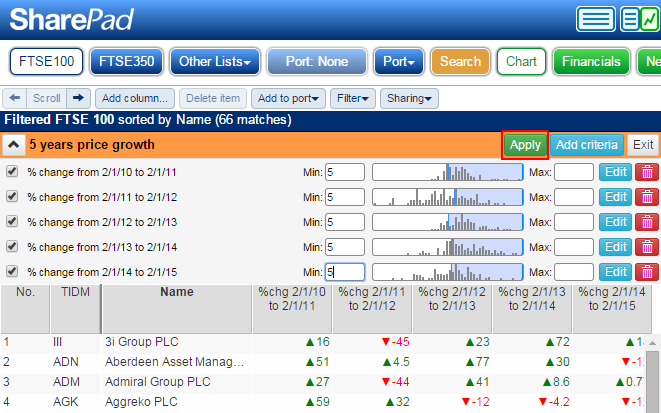
It is quicker to add all of the criteria first. Then set all of their minimum values to 5 and then click on Apply rather than change the minimum value and clicking on Apply for each criterion.

With all of the criteria applied you can see that I have a list of 7 shares to investigate further where each of them has risen by at least 5% for each of the last 5 years.
However, this filter doesn't take into account this year's price growth to-date.
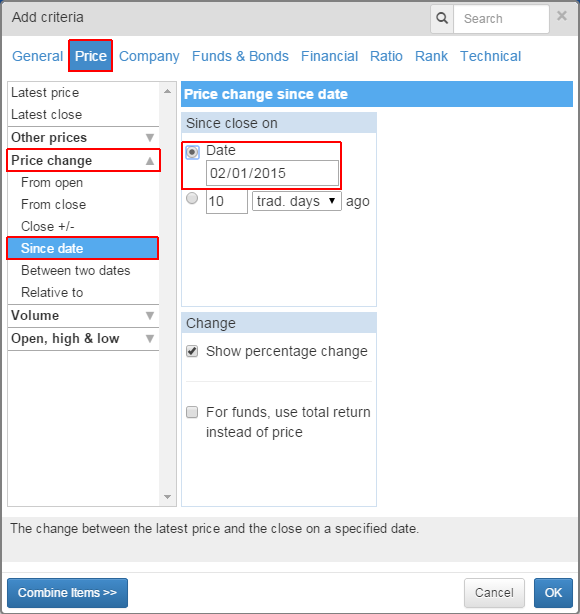
To add a criterion for this we can click on Add Criteria and select Price. However, this time we need to choose Price change and then Since date. Select Date on the right-hand-side and the start of the current year should already be the date in the box (in this case 02/01/2015). Finally click on OK.
Adding this criterion raises the question of how much percentage growth do you want to see for the year so far. At the time of writing this tutorial we are in March, a quarter of the way through the year. So should I only require the growth for the year so far to be 1.25%? (5%/4).
In this situation the value used will be up to you but I have for the example used the above figure of 1.25
Set the Min value and then make sure you click on Apply.
It is important to remember when adding or editing criterion the changes will not be applied to the filter until you click on the Apply button
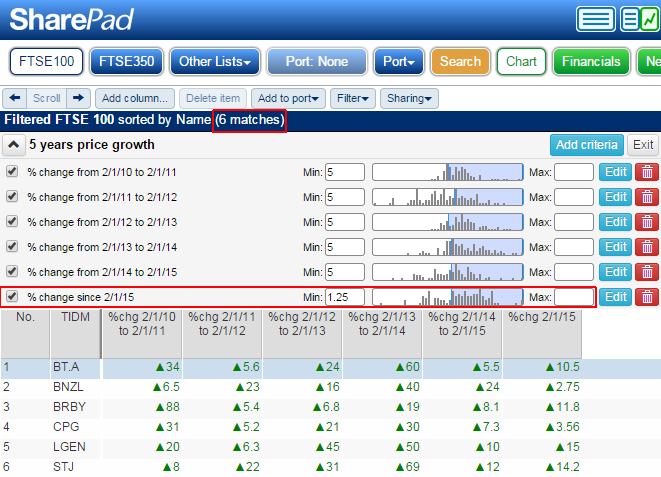
You can see that we are now down to 6 matches which means one of the shares on our previous list has not met our performance requirement for the year so far.
Changing list
The filter is currently being applied to the FTSE 100 list but it is possible to apply it to any list available in ShareScope.
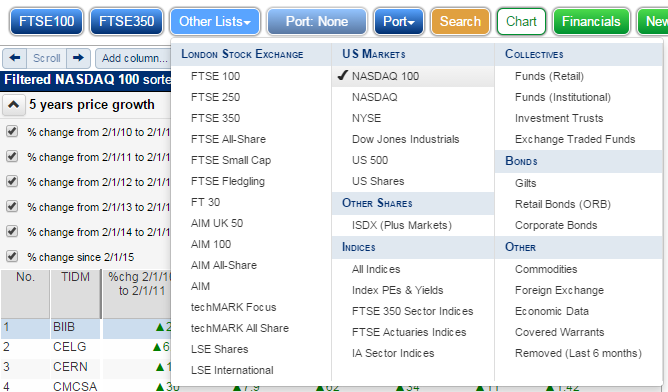
To change the filtered list click on the Other Lists button and make your selection from the drop down list or click on the FTSE 350 button. Both are located on the Main toolbar.
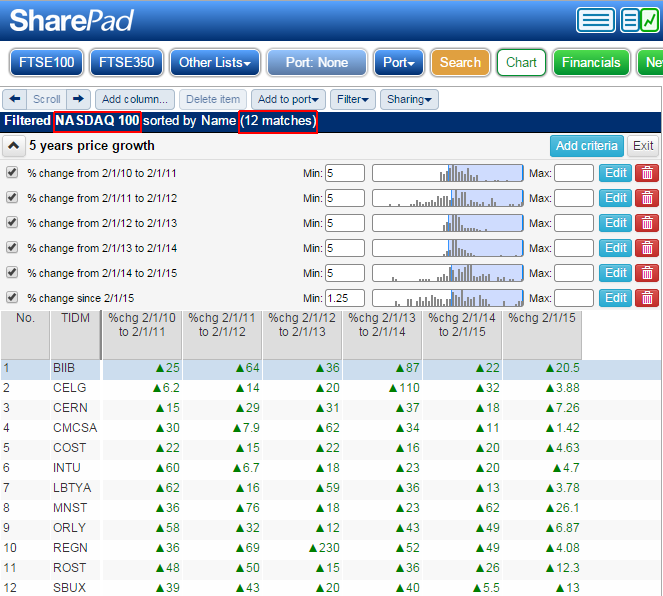
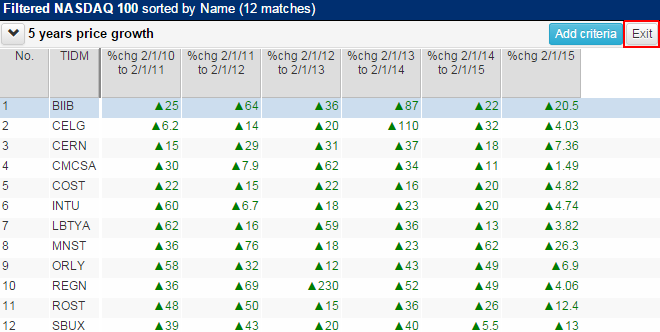
In this case I selected the NASDAQ 100. You can see that the filter returns 12 matches that you can then investigate further as part of this investment strategy.
Additional options
You may have noticed that each of the criteria has its own set of options.

The tick box on the left-hand side can be used to toggle the filter on and off. Note you will need to click on the Apply button If you tick or untick the box.
The EDIT button allows you to edit the criterion you have selected. For example if you wanted to change the dates of one of the criterion in the example then you would use the EDIT button to do so.
Note if you edit the criterion then the column created by that criterion will also be changed. However, the reverse is not true. If you edit the column this will not change the criterion.
You also have a red Trashcan button which you can use to delete the criterion in question. Note: deleting a criterion is permanent so please use this option with caution.
When you have added several criteria to your filter they can start to take up a significant amount of screen space. To the left of the Filter name you'll see an arrow button currently pointing upwards. If you click on this the criterion for your filter will be hidden from sight.
If you wish to exit the filter altogether you can do so using the Exit button at the other end of this bar.
When you click on the Filter button and select Apply Filter from the list now you will see the filter you have created is now in the list of filters you can select.
If you wish to create a variation of the same filter you can Duplicate it. If you are happy with the filter and do not wish to any further changes to be made to it you can Lock the filter. Alternatively if the filter is locked you can Unlock the filter. If the filter is unlocked you can also Rename if you wish.
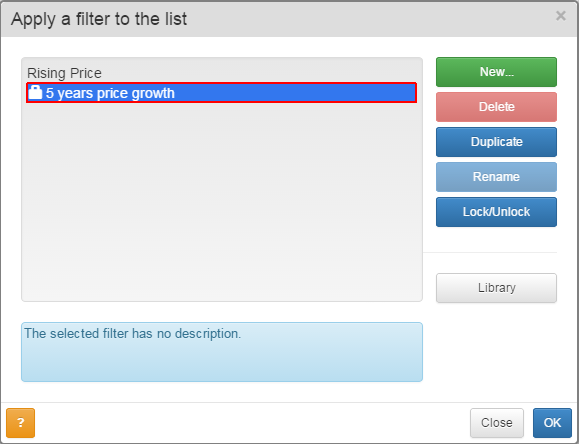
You can see when a filter has been locked that it is clearly marked with a padlock.
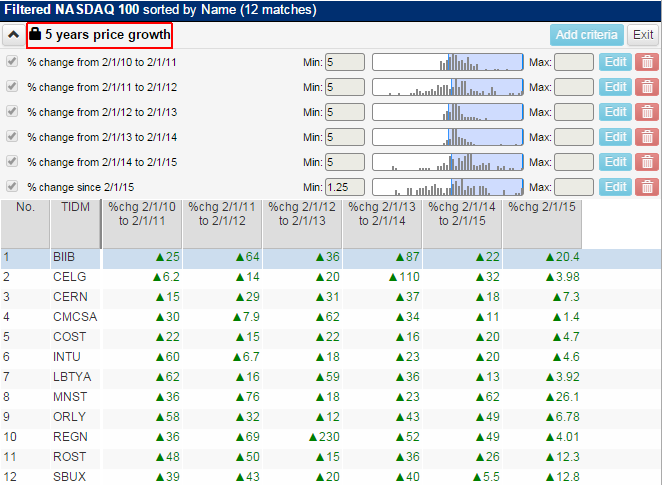
When you select a locked filter you can clearly see that the filter is locked as there is also a padlock before the filter's name and all of the options to add and edit the criteria are greyed-out.
Using the library
Also on the Apply a filter to the list dialog window is the Library button. Click on this and the Filter library dialog window will open.
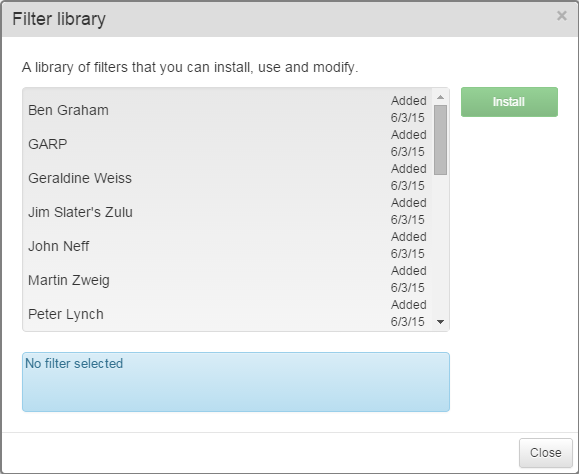
The Filter library contains a series of filters we have created that we hope you will find useful. This includes the list of Guru Filters and others based on both fundamental data and technical analysis.
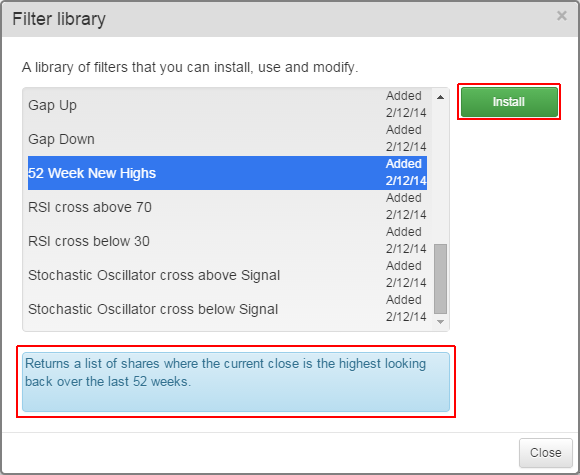
Scroll down the list and select the 52 Week New Highs filter. Note that each of the filters in the library comes with a description. Once you have selected the filter click on the Install button and the click on Close.
You will be returned to the Apply a filter to the list window and the last imported filter will be the currently selected filter in the list. Click on OK.
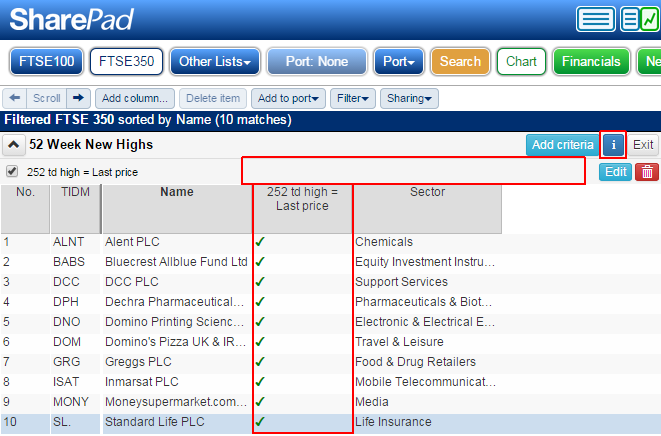
Here the filter has been applied to the FTSE 350 list. You'll notice there are some differences between this filter and the example created earlier in this tutorial.
Filters with a description show an  button between Add criterion and Exit buttons.
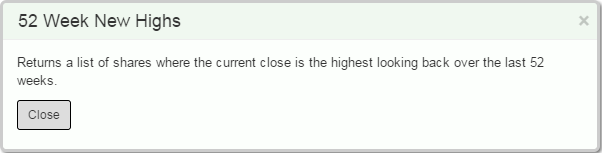
This opens a window that will show you the description of the filter.
You will also note that there are no values to adjust or a range bar on the criterion and the column that has been added to the table when the criterion was created is populated by green ticks.
If you Edit the criterion you will see that it opens a completely different dialog window. This is because it uses the Combine option that can be found at the bottom left the Add criterion dialog window.
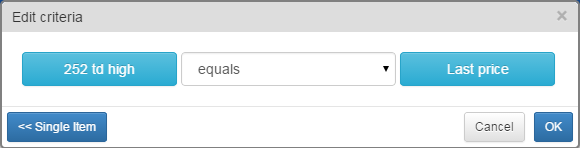
Here we have chosen to 252 td high on the left and Last price on the right and selected equals as the operand. Note: "td" means trading days, there are 252 trading days in a calendar year, this equates to 21 trading days in a calendar month.
The criterion is asking the question; is the Last price equal to the 252 td high? If the answer is yes the share receives a tick if the answer is no; it does not.
In such cases the criterion will only show those shares with a yes answer i.e. those that display a tick in the column.
In the following example we have imported and selected the Ben Graham guru filter and applied it to the FTSE All-Share list. You can see a similar situation with the last criterion of this filter; "Industry excludes Utilities"
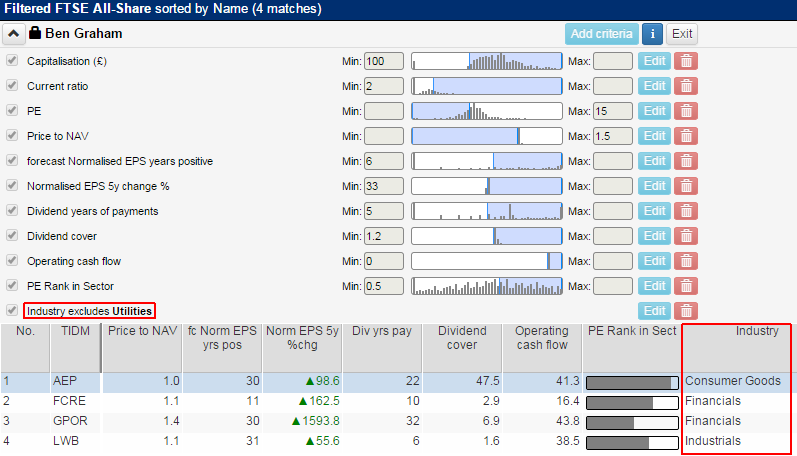
In this case if the share is in the Utilities industry then it receives a No and is excluded from the list. However, you can see that the column that is added is the Industry column so you can see which industry the shares in your list of results are in.
Apply Quick Filter
When you select Filter and then Apply Quick Filter you are taken directly to a new filter table and are able to start adding criteria immediately.

Note that instead of a name the filter is called "QuickFilter". This is because at this point the filter is temporary. It is designed so that you can quickly filter a list for one or more criteria and then either exit the filter, discarding it, or opting to keep it if you are happy with how it works.
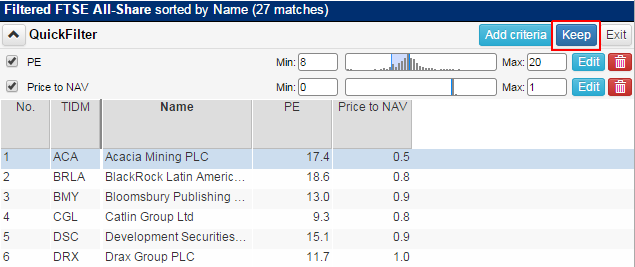
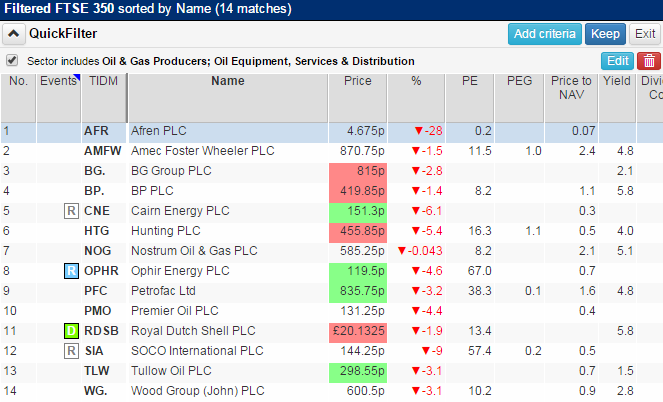
In this example we have created a quick filter that looks for shares, in the FTSE All-Share list, that have a PE of between 8 and 20 and a Price to NAV (Price to Book) of between 0 and 1.
When one or more criteria, have been added the filter you will see that a Keep button appears.
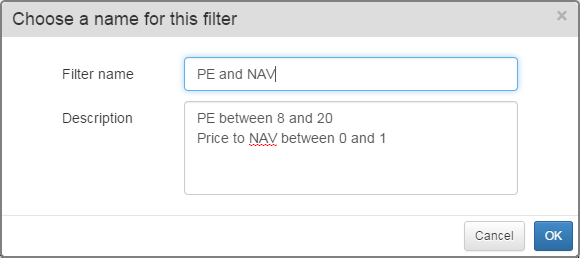
If you click on this then can give the filter a name and description and it will be saved in your list of filters. If you do not opt to Keep the filter and click on Exit then the filter will be deleted.
Apply Sector Filter
Selecting Apply Sector Filter from the Apply Filter menu takes you straight to a dialog from which you can select any one of the sector classifications for LSE Stocks from Aerospace & Defense to Travel & Leisure. You can also use Sector Filter on funds, investment trusts and ETFs.
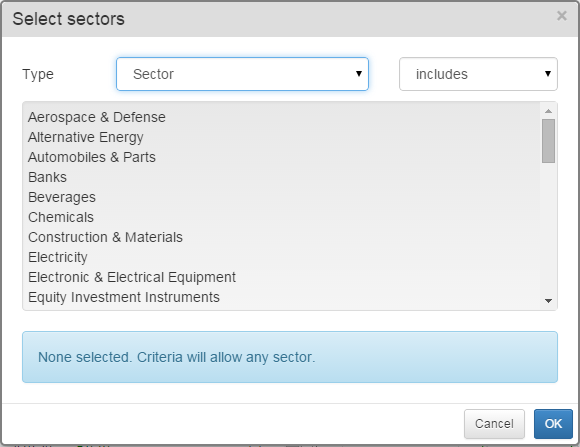
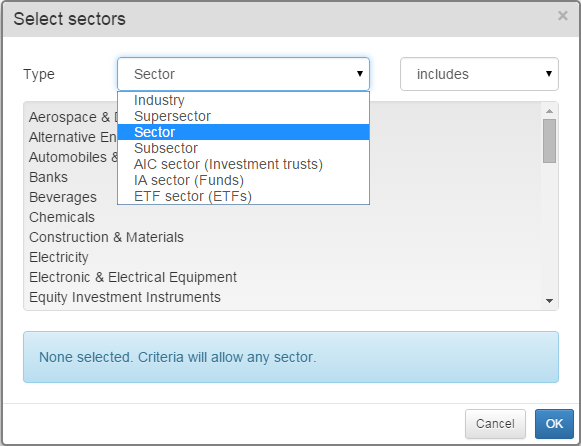
It is also possible to select Industry, Supersector, Subsector, AIC sector (Investment trusts), IA sector (Funds) or ETF sector (ETFs) .
Note: the IA sectors were previously known as the IMA sectors.
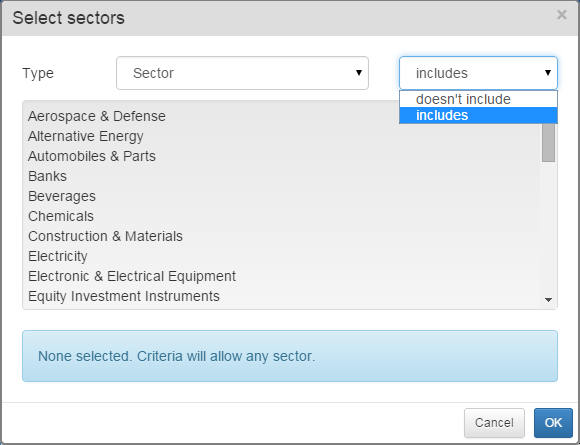
It is also possible to choose between includes and doesn't include.
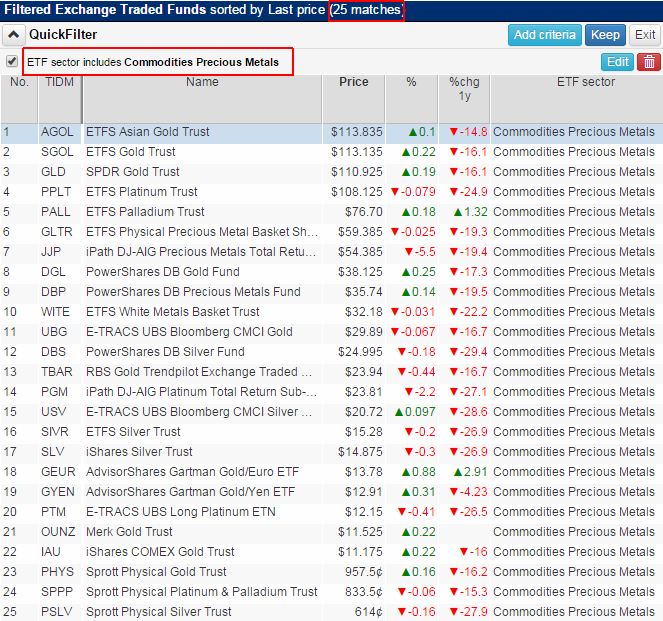
In this example we have filtered the Exchange Traded Funds list by the ETF Sector Commodities Precious Metals.
Again should we wish to save this filter we can click on the Keep button and give the filter a name and if we wish a description.
You should note that it is possible to select more than one sector when filtering the list in this way.
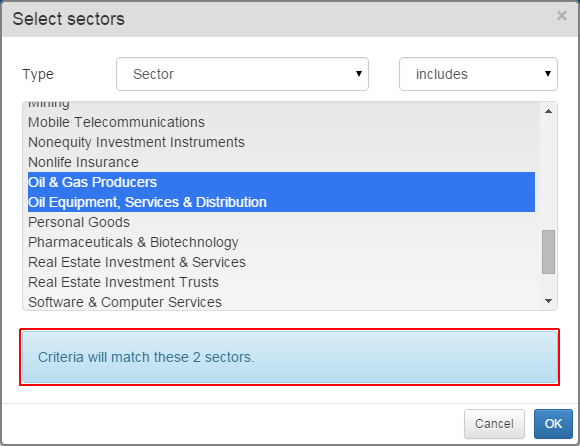
You can see that the dialog clearly shows you how many sectors you have selected. If we apply this filter to the FTSE 100 list then we are provided with a list of 14 matches.